Carriers
The Carriers module allows the user to track and total their carrier costs/expenses. This includes being able to pay/charge carriers directly through Multipub.
Each carrier is required to have two accounts created in Multipub. The first, is an individual Subscriber Account. This allows the carrier to be charged/paid through Multipub. The second, is a Carrier Account that is associated with the subscriber account.
Once the user is finished with their carrier setup (Subscriber & Carrier accounts), the user simply enters the products and rate codes that suit the carrier’s needs for the period that will be billed.
Carrier Subscriber Entry
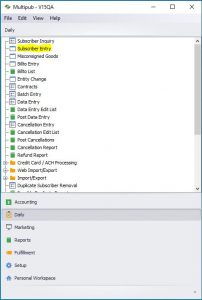
This is where the user creates the Subscriber Account.
Subscriber Accounts are found in Multipub by:
Main Menu > Daily > Subscriber Entry or Subscriber Browse
When entering your carrier subscriber, the “customer type” box is filled as a DLV (delivery) and your “Cust. Sub type” will be either a carrier or truck.
Carrier Setup
This is where the Carrier Record will be created, as well as where the routes are added.
Carrier Setup is found by following these steps in Multipub:
Setup > Postal/Delivery > Carrier Setup > Add Control (White & blue folder in top left corner)
Once you have entered your carrier’s information (Sub #, start/end date, SSN, contract date & blto#), all you need to do is hit the “Save” icon (save disc) above the edit record tab, and your carrier information should appear below in the “Records” tab.
You can come back to this screen and edit your carriers’ information on the “Edit Detail Record” tab on the right side of the screen.
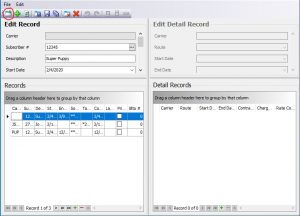
- Carrier – Enter the name of the carrier
- Subscriber – This is the carrier’s Subscriber Account #
- Description– Add any pertinent information
- Start/End Dates – Time period of carrier deliveries
- Contract Date – When the Carrier Contract starts
- SSN – Social Security Number
- Blto# – if carrier has different billing address than carrier’s physical address
Entering Carrier Transactions
This is where you will enter the products your carrier will need to purchase.
These transactions include daily use items (rubber bands, bags, bond, insurance etc.).
Similar to entering a transaction for a subscription customer, you will start by creating a batch. This batch can either be a single line batch, or a multiple line batch, depending on the product(s) your carrier needs. If it is a multiple line batch, simply select “Multiple Lines” when creating the batch entry record.
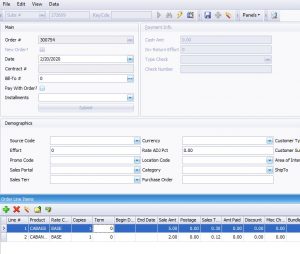
The first step is to create a data entry record, then enter the subscriber number.
Next, select “New Order.”
Select “Add” (the green “plus” icon under the “Order Line Items” tab)
Now you should be able to add the items needed for purchasing.
Carrier Charges
These charges are applied differently than the ones entered for daily charges (rubber bands, bags, bond, insurance etc.). These Carrier Charges include delivery distance credit, route profit adjustment, Haul, etc. Because these are different charges, they will be entered in the “Recurring Charges/Credits” tab instead of through Data Entry.
Before setting up recurring charges/credits for the carrier, the initial charges need to be set up.
- Main Menu > Set up > Accounting/Tax > Charges
- Hit the green “Plus” icon in the top left to add a new charge
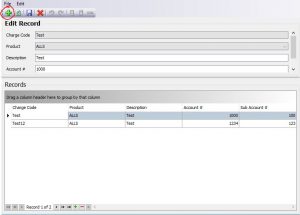
- Charge Code – An identifiable code
- Product – Product Code
- Description – Descriptive name of the charge
- Account # – General Ledger account number
Sub. Account # – General Ledger Sub Account number
Carrier Recurring Charges/Credits
In Multipub, this is where charges/credits are assigned to the carrier.
Navigation:
- Main Menu > Accounting > Carrier Billing > Carrier Recurring Charges/Credits
- Click the green “plus” icon in the top left corner to add a new charge. Clicking it again will apply the charge and move it to the “records” tab, while allowing you to enter another charge.
- Click the “Save” icon (classic save disc) to save those charges/credits

Field Explanation
- Carrier – Select the carrier receiving the charge/credit
- Route – Select the route to add the charge/credit
- Product – Select product code for this carrier/route
- Charge Code – Select the charge code that describes the type of charge/credit
- Amount – the amount for the charge/credit ((+) is a charge, (-) is a credit)
Generate Carrier Transactions
“Generate Carrier Transactions” will read through all orders and generate transactions that are to be included on the carrier statement.
This function will tally the amount owed to the carrier as a result of their deliveries, plus any tips, plus any subsidies, less any delivery expenses, bonds, and insurance.
When you create the report, it will be generated in the spooler. Once you open the report, you can see the product(s) selected, batch number, and the number of records generated.
Navigation:
- Main Menu > Accounting > Carrier Billing > Generate Carrier Transactions
Notes/Tips:
- The Generate Carrier Transactions program will read through looking for order and product code/type entered
- Always check to see if issues were delivered during the entered Date Range
- Make sure the issues delivered were carrier delivered (have a route # on their order)
- Tally the number of copies/drops/orders for a carrier based on their payment metric
- Include any other orders with an order date in the date range where the carrier (or route) is specified on the order
- Make sure to include all orders belonging to the carrier’s subscriber record to the statement. This will pick up delivery expenses, bond, insurance, etc.
Double check carrier history records for the carrier to make sure they haven’t already been charged or paid for the items.
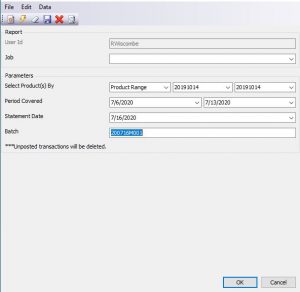
Field Explanation
- Select Product(s) By – Select the product(s) you want to create transactions for
- Period Covered – Select the Date Range
- Statement Date – Select the date you would like to show on the statement
- Batch – This is a free form field
Carrier Transaction Entry
The Carrier Transaction Entry is related to the transactions generated from the “Generate Carrier Transactions.” These transactions appear in the grid with the “create, update and/or delete” functionality.
Navigation:
- Main Menu > Accounting > Carrier Billing > Carrier Transaction Entry
- When you select the green “plus” icon I the top left, you will see this window to enter your information
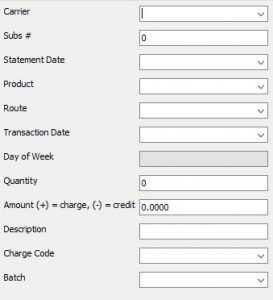
When you update, add, or delete a transaction on this screen, it is a one-time only option. This means that the next time carrier transactions are generated, the “one-time” items will not be displayed again.
If you need to run “Generate Transactions” again prior to posting, any updates/adds/deletes will be wiped.
Generate Carrier Statements
This program reads through all the carrier transactions to produce a carrier statement in the format provided by you
Enter the batch used “Generate Carrier Transactions” program was run.
Enter the statement date.
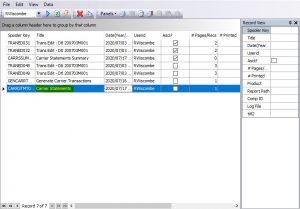
In the Spooler, look for the report called “Carrier Statements.”
The report will display any charges the carrier owes and/or any credits owed to the carrier
You will be able to see the number of papers the carrier delivered to the customer within the dates of the period.
Post Carrier Statements
This section provides details for posting your carrier statements. The “Post Carrier Statements” program reads through your Carrier Transactions and posts them to the Carrier Statement History table.
This program will also create all the journal entries for the activity.
After your statements have been reviewed, you can post them.
Accounts will include:
- A/P
- Delivery Expense (General Ledger account by product)
- A/R entries by product (net from the original order)
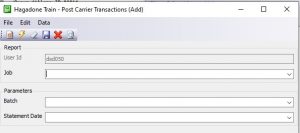
Enter the batch number and statement date you’d like to post (you do NOT need to fill out the “job” section).
Carrier Statement History
This is a table that holds all the details of your carrier statements and is updated after your statements have been posted.
Navigation:
- Daily > Subscriber Inquiry > Select your subscriber > Order history Icon
Carrier Headsheets
The headsheets provide carrier and delivery information, including the truck number, route number, total orders, number of bundles, the key bundle size, and standard bundle size. The delivery instructions include the customer information, as well as specified delivery instructions such as “please deliver paper to garage door.”
You can run a headsheet for an individual truck and route, or for a product and issue date.
Navigation:
Main Menu > Fulfillment > Alternate Delivery > Headsheets

Carrier Account List
This list displays the carrier name, address, phone number, contract review date, etc. Simply this is where you find individual carrier information.
Navigation:
- Main Menu > Accounting > Carrier Billing > Carrier Account List
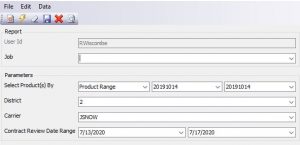
- Select Product(s) by:
- Product range – allows you to enter a range of products according to their product code
- Product List – allows you to create a list of products according to the product code
- Product Group Range – creates a range of products according to their group type (print, online, custom etc.)
- Contract Review Date Range – The range of time that is in the contract details entered previously
